Showing posts with label Azure DevOps. Show all posts

Thursday, June 3, 2021

How to backup Azure DevOps code repositories

Under "shared responsibility in the cloud" model, the client is always responsible for its own data. Azure DevOps, as a SaaS offering, ensures that underling infrastructure (compute, network, storage, etc.) is highly available and the client's data is geo-replicated. You can find all the details how Azure DevOps protects your intellectual property here. However, you might want to have an "offsite" copy of your repositories for archiving, doomsday disaster recovery, or any other reasons.

I've used an approach described by Charbel Nemnom in his blog post. The process was enhanced to cover ALL code repositories within Azure DevOps project (TFVC including) and remove the dependency on the user's PAT.

The backup pipeline

We will use classic build pipeline with schedule trigger to automate the backup process. The YAML pipeline is not suitable for the next reasons:

  1. We want to use native functionality to checkout source code from TFVC
  2. TFVC doesn't support YAML pipelines (we want to backup ALL repositories)
  3. Single pipeline will automatically cover all curent and future Git repositories without any extra steps required
The pipeline use existing project's TFVC repository as a source:

Here, we use mapping feature to checkout code stored in TFVC into subfolder. The pipeline tasks will create extra subfolders for each Git repository within sources directory on the executing agent.

Note. If your project doesn't have TFVC repository, you need to create one:

Select "Empty job" as a pipeline template. In this state, we have a pipeline that will checkout TFVC code. 

Task 1. Download Git Repos


We need to add a task that will download all Git repositories to the agent. The pipeline will use next PowerShell script that utilizes VSTeam module to perform Git repositories discovery and cloning.


Couple words about security. The script uses build service identity to access Git repositories. In order this to work, two Azure DevOps settings need to be changed.
  1. The pipeline job needs to have access to the OAuth token at the runtime:


  2. The job needs to be authorized to access all repositories in the project (otherwise the pipeline will 'see' only explicitly referenced repositories, see documentation for details):


Task 2. Archive source code
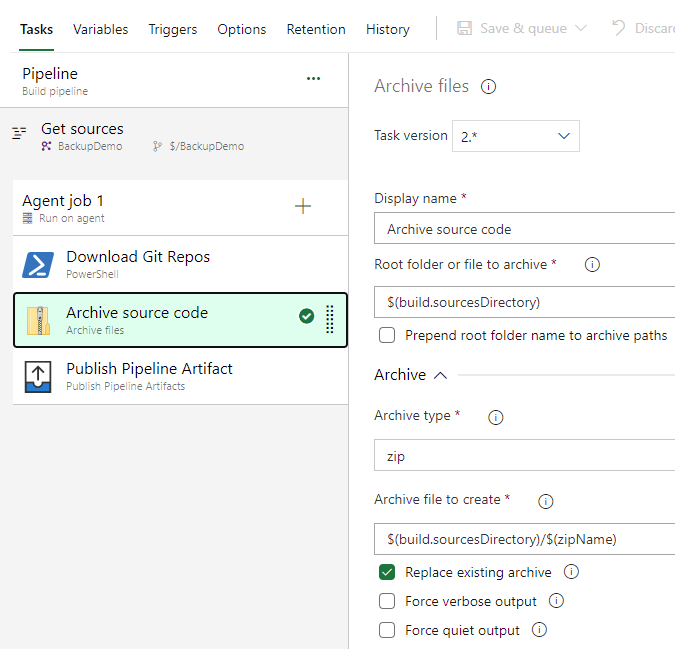
This a standard task that will put all the files collected in the agent's source folder into a ZIP file.

Task 3. Publish Pipeline Artifact


In this demo, we just publish generated repositories archive back to Azure DevOps. In the real world scenario, there are multiple options of what can be done with this archive file:
  1. Upload to the cloud storage service of your choose
  2. Copy to the file server in the corporate network where the regular backup process will take care of the long-term retention
  3. etc.

Trigger


The pipeline is scheduled to perform nightly backups. Checkbox "Only schedule builds if the source or pipeline has changed" must be un-checked to ensure the schedule is not affected by no changes in TFVC repository.

Restore

The Git repositories restore process is described in the blog post I've referenced in the beginning of this article. The TFVC repository restore is as easy as copy TFVC folder content from archive file.

Note about TFVC

TFVC is centralized source control by its nature. It stores the files history on the server. For this reason, the TFVC backup produced by above process is a repository snapshot (at the backup time). The quasi-history can be build from the backup files produced on different days.(Probably, it would be the least of your worries if you will actually have an actual need to restore these repos).

Pipeline execution

My demo project contains next repositories
The downloaded pipeline artifact (the ZIP file) contains TFVC snapshot and the 'mirrors' of the Git repos:

Conclusion

I hope this article will help you to establish centralized source control backup for Azure DevOps and will let you (and your boss) to sleep well knowing that precious intellectual property has an extra layer of protection.


Monday, September 28, 2020

Stale braches cleanup in Git repo

As code development moves forward, collaboration and experimentation flourish, developers join and leave the team, the Git repos start to accumulate stale branches. There is no exact definition for for "stale branch", but both Azure DevOps and GitHub, have Stale branches view. This view displays "... branches in the repo that haven't had any commits in three months or longer". There are many reasons why branches became stale. Eventually, there will be a lots of them:


Apart from "polluting" the repo and making it harder to find branches, this situation has another side effect. When CI tools run pipelines, the worker machines (agents) have to clone repo on each run. During repo cloning, Git creates references files for braches in the local folder .git/refs/remotes/origin. This translates into a lot of small IO operations that affects pipeline execution time.

The manual clean up of the staled branches could be tedious process, especially when repo has tens, hundreds, or even thousands of such branches. Below is a simple PowerShell script that will help to automate the process.

$TTL = 90 #days
$borderTime = (Get-Date).AddDays(-$TTL)
git fetch origin
$remoteBranches = git branch -| Where-Object {$_ -like '*remotes/origin/*'} | ForEach-Object {$_.trim()}
$remoteBranches = $remoteBranches | Where-Object { ($_ -notlike 'remotes/origin/HEAD*') `
                                              -and ($_ -ne 'remotes/origin/master') }
foreach($branch in $remoteBranches){
    $branchName = ($branch.Split('/', 3))[2]
    $branchSHA = git rev-parse origin/$branchName
    $branchLastUpdate = [DateTime]::Parse($(git show ---format=%ci $branchSHA))
    if($branchLastUpdate -lt $borderTime)
    {
        Write-Output "git push origin :$branchName"
    }
}

The script needs to be run in the local repo folder, it can be executed as a file or just pasted into PowerShell console. As an output, the script will produce a list of "delete branch" git statements (without actually execution of them):

git push origin :branch_1
git push origin :branch_2
git push origin :task/xyz
...
git push origin :feature/abc

The list needs to be reviewed - the branches that have to be preserved must be removed from this list. After that, each statement can be executed individually, or all of them at ones as a batch. The excluded branches could be added into the script's branch filter (second Where-Object statement, lines 5-6) to review time in the feature.

Monday, September 14, 2020

Credentials renew for "automated" ARM connection in Azure DevOps

When you setup Azure Resource Manager connection in Azure DevOps using "Service principal (automatic)" authentication, Azure DevOps will create new service principal (app registration) in Azure Active Directory and grant this principal desired access to Azure resources. Have a look at the documentation here.

When the system setups the service principal in Azure AD, it will generate a client secret with 2 year expiration. Azure DevOps will store it in service connection (without exposing to the end-user) and will use it for Service Principal Authentication. This is where "automatic" part ends currently as Azure DevOps doesn't rollover client server after two years.

If you are not aware of this 2 years expiration period for the client secret, you will find yourself (like I found myself) in the situation where your Azure related tasks will start to fail with ExpiredServicePrincipal errors. The fix is obvious - go to Azure AD and create new client secret. It is not obvious thou how to configure service connection in Azure DevOps as there is no UI to provide new client secret (as it is "automatic" connection):

After some experimentation, I found that you just have to click "Save" button (see the picture above) to force Azure DevOps to create new client secret in Azure AD and update its service connection configuration. After this, do not forget to add a reminder to your calendar to repeat this process a week before the next 2 years expiration.

Monday, April 27, 2020

Automating automation: updating multiple Azure DevOps pipelines using Powershell scripting

Recently, I had to implement a workaround in the Azure DevOps classic release pipelines. This is relatively simple update - I would need to do next:
  1. find release in the Azure DevOps web UI and start release definition editor
  2. go into first stage/environment
  3. add a new instance of the "Azure Powershell" task into the list of the stage tasks
  4. configure this task
    • set name
    • set Azure subscription
    • set Powershell script file path
    • set script arguments
    • tell the task to use "Latest installed version" of the Azure Powershell module
  5. repeat steps 3 and 4 process for 2 other stages/environments in the current release definition

  6. repeat previous 5 steps for other 10 pipelines
As you can see, I had extremely tedious task on my hand. I would have to update 11 release pipelines, add and configure 3 * 11 = 33 new tasks. My ballpark estimation for the required "physical" effort became next (assuming I already had prepared strings for copy/paste operations): 

11 pipelines * 3 stages * 16 clicks = 528 mouse clicks
11 pipelines * 3 stages * (3 Ctrl-C + 3 Ctrl-V) = 192 keyboard buttons presses

By the time I finished with the second pipeline, I started to understand that I need to automate this process somehow; otherwise I will make mistakes and kill my wrists (plus the whole process is very boring :-). 

The Azure DevOps REST API is an obvious solution to create automated update process. As with any other API's, there is a learning curve to understand how to authenticate, build requests, parse output, how abstracts connects with each other, etc. Fortunately, I found a "shortcut": Powershell module VSTeam created by Donovan Brown. This module is a Powershell wrapper for Azure DevOps API and really made my life easier. TO start with this module, you can find the details of how to install and configure VSTeam here.

Let's go back to my task - I had 9 more release pipelines to update, and I wanted to automate the whole process for consistency (plus had some coding fun). Since all of the affected pipelines had been created from the same coockie-cutter template release, I knew what I had to do exactly:
  1. get task #3 from each stage of my étalon pipeline (stages are different by Azure Service Principal used - "Azure Subscription" of the first screenshot)
  2. insert the étalon tasks into all other pipelines as step #3 of the corresponding stages
  3. skip already updated pipeline :-)
The result of all this effort is a Powershell script below. I added comments to explain how does it work.

P.S. As an alternative solution, I could convert these pipelines into YAML format, but it is a task for the feature.

How to backup Azure DevOps code repositories

Under " shared responsibility in the cloud " model, the client is always responsible for its own data. Azure DevOps, as a SaaS off...