Showing posts with label Powershell. Show all posts

Thursday, June 3, 2021

How to backup Azure DevOps code repositories

Under "shared responsibility in the cloud" model, the client is always responsible for its own data. Azure DevOps, as a SaaS offering, ensures that underling infrastructure (compute, network, storage, etc.) is highly available and the client's data is geo-replicated. You can find all the details how Azure DevOps protects your intellectual property here. However, you might want to have an "offsite" copy of your repositories for archiving, doomsday disaster recovery, or any other reasons.

I've used an approach described by Charbel Nemnom in his blog post. The process was enhanced to cover ALL code repositories within Azure DevOps project (TFVC including) and remove the dependency on the user's PAT.

The backup pipeline

We will use classic build pipeline with schedule trigger to automate the backup process. The YAML pipeline is not suitable for the next reasons:

  1. We want to use native functionality to checkout source code from TFVC
  2. TFVC doesn't support YAML pipelines (we want to backup ALL repositories)
  3. Single pipeline will automatically cover all curent and future Git repositories without any extra steps required
The pipeline use existing project's TFVC repository as a source:

Here, we use mapping feature to checkout code stored in TFVC into subfolder. The pipeline tasks will create extra subfolders for each Git repository within sources directory on the executing agent.

Note. If your project doesn't have TFVC repository, you need to create one:

Select "Empty job" as a pipeline template. In this state, we have a pipeline that will checkout TFVC code. 

Task 1. Download Git Repos


We need to add a task that will download all Git repositories to the agent. The pipeline will use next PowerShell script that utilizes VSTeam module to perform Git repositories discovery and cloning.


Couple words about security. The script uses build service identity to access Git repositories. In order this to work, two Azure DevOps settings need to be changed.
  1. The pipeline job needs to have access to the OAuth token at the runtime:


  2. The job needs to be authorized to access all repositories in the project (otherwise the pipeline will 'see' only explicitly referenced repositories, see documentation for details):


Task 2. Archive source code
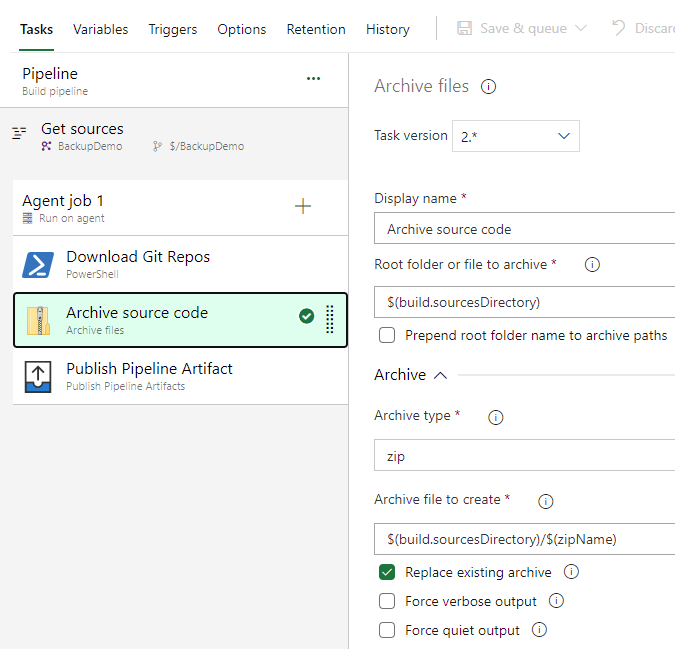
This a standard task that will put all the files collected in the agent's source folder into a ZIP file.

Task 3. Publish Pipeline Artifact


In this demo, we just publish generated repositories archive back to Azure DevOps. In the real world scenario, there are multiple options of what can be done with this archive file:
  1. Upload to the cloud storage service of your choose
  2. Copy to the file server in the corporate network where the regular backup process will take care of the long-term retention
  3. etc.

Trigger


The pipeline is scheduled to perform nightly backups. Checkbox "Only schedule builds if the source or pipeline has changed" must be un-checked to ensure the schedule is not affected by no changes in TFVC repository.

Restore

The Git repositories restore process is described in the blog post I've referenced in the beginning of this article. The TFVC repository restore is as easy as copy TFVC folder content from archive file.

Note about TFVC

TFVC is centralized source control by its nature. It stores the files history on the server. For this reason, the TFVC backup produced by above process is a repository snapshot (at the backup time). The quasi-history can be build from the backup files produced on different days.(Probably, it would be the least of your worries if you will actually have an actual need to restore these repos).

Pipeline execution

My demo project contains next repositories
The downloaded pipeline artifact (the ZIP file) contains TFVC snapshot and the 'mirrors' of the Git repos:

Conclusion

I hope this article will help you to establish centralized source control backup for Azure DevOps and will let you (and your boss) to sleep well knowing that precious intellectual property has an extra layer of protection.


Monday, March 8, 2021

How to get Tableau server REST API version

 Tableau server REST API has endpoint "serverinfo" to find information about server's REST API version:

GET /api/api-version/serverinfo

 As per documentation, for api-version you have to specify "The version of the API to use, such as 3.10". This creates chicken/egg situation: you need to know API version in order to get API version. To resolve this dilemma, I use "2.4" as a value for api-version. The endpoint "serverinfo" was introduced in API version 2.4 (Tableau Server 10.1) - this is minimum possible API version that can be used for this endpoint. When you call "serverinfo" like this:

GET /api/2.4/serverinfo

the server will response with the actual api version:

  <tsResponse ...>

  <serverInfo>

    <productVersion build="20204.20.1116.1810">2020.4.0</productVersion>

    <restApiVersion>3.10</restApiVersion>

  </serverInfo>

</tsResponse>

I use next PowerShell one-liner to get API version in my scripts:

(Invoke-RestMethod -Method Get -Uri "https://$tableauServer/api/2.4/serverinfo" -Headers @{Accept = 'application/json'}).serverInfo.restApiVersion

Bonus tip. Header "Accept: application/json" forces Tableau RESP API to response in JSON format instead of the default XML. This allows PowerShell cmdlet Invoke-RestMethod to conveniently convert API responses into .Net object, making Tableau REST API manipulations a bit easier.

Wednesday, June 24, 2020

How to get Azure REST APIs access tokens using PowerShell

Sometimes, I had to step out of the comfort of the Azure PowerShell  module and call Azure REST APIs directly. Usually, it is required when there is no cmdlet wrapper for some API, or Az module does not support some underlying API functionality.

As you already know, such calls are regular HTTP requests and can be executed by using cmdlets Invoke-WebRequest or Invoke-RestMethod. The essential part of these HTTP requests is authentication. For this purpose, the HTTP request must contain "Authorization" header that contains access token for API.

Little bit of theory

It is relatively easy to get the token when your code has complete control over credentials. For example, it is interactive PowerShell session where user can provide them, or it is a script that has values of the client id and client secret for service principal. However, often, the scripts have to be executed in the automated, non-interactive environment like CI/CD pipelines where underlying CI/CD product (e.g. Azure DevOps) manages the access credentials and prepares Azure Context for script execution (by implicit Connect-AzAccount cmdlet execution). In such scenarios, it possible to utilize Azure PowerShell module ability to transparently get access token when its cmdlets access control/data planes of the different services. For example, Get-AzKeyVault is control plane call against endpoint https://management.azure.com, while Get-AzKeyVaultSecret is data plane call against endpoint https://{some-vault}.vault.azure.net. The module use MSAL to acquire tokens from Azure AD, cache and renew them. A one-liner will return the list of the tokens in the current  Azure PowerShell session:

(Get-AzContext).TokenCache.ReadItems()

Practice

Now, let see how we can use this ability of the Azure PowerShell module for our purpose - call one of Azure APIs. Let say, we need to perform direct API call against our Key Vault. To ensure that token cache has access token for desired API (Key Vault), we will perform a simple secret KV read using cmdlet from Az.KeyVault module:

Get-AzKeyVaultSecret -VaultName $kvName -Name $secretName

Now, token cache has access token for data plane of our Key Vault (assuming current context identity has read access to this KV secrets and Get-AzKeyVaultSecret succeeded; the actual secrets doesn't have to exists).

We can get this token from cache

$tokenCache = (Get-AzContext).TokenCache.ReadItems()
$cacheItem = $tokenCache | Where-Object { $_.Resource -eq 'https://vault.azure.net' }
$kvAccessToken = $cacheItem.AccessToken

and use it to call desired API

$token = ConvertTo-SecureString -String $kvAccessToken -AsPlainText -Force
...
Invoke-RestMethod -Method Post -Uri $URI -ContentType "application/json" `
    -Authentication Bearer -Token $token -Body $body

Side note. In the interactive session, where the user potentially is a member of the multiple Azure AD tenants or Azure PowerShell context contains multiple session for different users, additional filtering of the token cache based on TenantId and DisplayableId (user logon name) will be required.

In my next post, I will show how I used this access token acquisition technique to solve a real life "non-standard" task.

Update (November 26, 2020)

Since the release of Az module version 5.x, cmdlet Get-AzContext doesn't populate TokenCache property anymore. New cmdlet Get-AzAccessToken, avalable starting Az v 5.1.0, can be used now to acquire access tokens:

$kvAccessToken = (Get-AzAccessToken -ResourceUrl 'https://vault.azure.net').Token

Monday, April 27, 2020

Automating automation: updating multiple Azure DevOps pipelines using Powershell scripting

Recently, I had to implement a workaround in the Azure DevOps classic release pipelines. This is relatively simple update - I would need to do next:
  1. find release in the Azure DevOps web UI and start release definition editor
  2. go into first stage/environment
  3. add a new instance of the "Azure Powershell" task into the list of the stage tasks
  4. configure this task
    • set name
    • set Azure subscription
    • set Powershell script file path
    • set script arguments
    • tell the task to use "Latest installed version" of the Azure Powershell module
  5. repeat steps 3 and 4 process for 2 other stages/environments in the current release definition

  6. repeat previous 5 steps for other 10 pipelines
As you can see, I had extremely tedious task on my hand. I would have to update 11 release pipelines, add and configure 3 * 11 = 33 new tasks. My ballpark estimation for the required "physical" effort became next (assuming I already had prepared strings for copy/paste operations): 

11 pipelines * 3 stages * 16 clicks = 528 mouse clicks
11 pipelines * 3 stages * (3 Ctrl-C + 3 Ctrl-V) = 192 keyboard buttons presses

By the time I finished with the second pipeline, I started to understand that I need to automate this process somehow; otherwise I will make mistakes and kill my wrists (plus the whole process is very boring :-). 

The Azure DevOps REST API is an obvious solution to create automated update process. As with any other API's, there is a learning curve to understand how to authenticate, build requests, parse output, how abstracts connects with each other, etc. Fortunately, I found a "shortcut": Powershell module VSTeam created by Donovan Brown. This module is a Powershell wrapper for Azure DevOps API and really made my life easier. TO start with this module, you can find the details of how to install and configure VSTeam here.

Let's go back to my task - I had 9 more release pipelines to update, and I wanted to automate the whole process for consistency (plus had some coding fun). Since all of the affected pipelines had been created from the same coockie-cutter template release, I knew what I had to do exactly:
  1. get task #3 from each stage of my étalon pipeline (stages are different by Azure Service Principal used - "Azure Subscription" of the first screenshot)
  2. insert the étalon tasks into all other pipelines as step #3 of the corresponding stages
  3. skip already updated pipeline :-)
The result of all this effort is a Powershell script below. I added comments to explain how does it work.

P.S. As an alternative solution, I could convert these pipelines into YAML format, but it is a task for the feature.

How to backup Azure DevOps code repositories

Under " shared responsibility in the cloud " model, the client is always responsible for its own data. Azure DevOps, as a SaaS off...